
03 Aug Home Automation using ESP8266 and Telegram
In this post let’s learn how to use the smartphone Telegram app to perform home automation.
BOM:
- NodeMCU
- Relay
- Jumper wire
- Telegram
Hardware circuit:
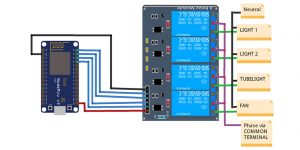
| Relay Module | NodeMCU |
| GND | GND |
| VCC | VCC |
| DIN | GPIO5 (D1) |
Steps
1) Telegram bot library:
The Telegram bot library is necessary to integrate with the Telegram application.
2) Telegram App Setup:
Install telegram application on your smartphone and look for botfather. Create a new bot using botfather. From botfather, you will receive an API token, the authentication key to get connected with Telegram API.
- After the successful installation of telegram application on your smartphone look for botfather channel and do as per the instructions given.
- Generate new bot type named /newbot and give your bot a name as shown below.


You will now receive the API token that allows ESP8266 integration with Telegram.
Source Code
| //by Avotrix | |
| #include <ESP8266WiFi.h> | |
| #include <WiFiClientSecure.h> | |
| #include <UniversalTelegramBot.h> | |
| char ssid[] = “YOUR_WIFI_SSID”; | |
| char password[] = “YOUR_PASSWORD”; | |
| #define BOTtoken “YOUR_TELEGRAM_TOKEN”; //Bot Token Telegram | |
| WiFiClientSecure client; | |
| UniversalTelegramBot bot(BOTtoken, client); | |
| int Bot_mtbs = 1000; | |
| long Bot_lasttime; | |
| bool Start = false; | |
| void handleNewMessages(int numNewMessages) | |
| { | |
| Serial.print(“NewMessages “); | |
| Serial.println(String(numNewMessages)); | |
| for (int i=0; i<numNewMessages; i++) | |
| { | |
| String chat_id = String(bot.messages[i].chat_id); | |
| String text = bot.messages[i].text; | |
| String from_name = bot.messages[i].from_name; | |
| if (from_name == “”) from_name = “Guest”; | |
| if (text == “test”) | |
| { | |
| bot.sendMessage(chat_id, “Hello”); | |
| } | |
| if (text == “lamp on”) | |
| { | |
| bot.sendMessage(chat_id, “Lamp ON”); | |
| Serial.println(“Lamp ON”); | |
| digitalWrite(16, 0); | |
| } | |
| if (text == “lamp off”) | |
| { | |
| bot.sendMessage(chat_id, “Lamp OFF”); | |
| Serial.println(“Lamp Off”); | |
| digitalWrite(16, 1); | |
| } | |
| } | |
| } | |
| void setup() | |
| { | |
| Serial.begin(115200); | |
| pinMode(16, OUTPUT); | |
| digitalWrite(16, 1); | |
| WiFi.mode(WIFI_STA); | |
| WiFi.disconnect(); | |
| delay(10); | |
| Serial.print(“Connecting Wifi: “); | |
| Serial.println(ssid); | |
| WiFi.begin(ssid, password); | |
| while (WiFi.status() != WL_CONNECTED) | |
| { | |
| Serial.print(“.”); | |
| delay(50); | |
| } | |
| Serial.println(“”); | |
| Serial.println(“WiFi connected”); | |
| Serial.print(“IP address: “); | |
| Serial.println(WiFi.localIP()); | |
| } | |
| void loop() | |
| { | |
| if (millis() > Bot_lasttime + Bot_mtbs) | |
| { | |
| int numNewMessages = bot.getUpdates(bot.last_message_received + 1); | |
| while(numNewMessages) | |
| { | |
| Serial.println(“”); | |
| handleNewMessages(numNewMessages); | |
| numNewMessages = bot.getUpdates(bot.last_message_received + 1); | |
| } | |
| Bot_lasttime = millis(); | |
| } | |
| } |
view raw Home Automation usingESP8266.ino hosted with ❤ by GitHub
Explanation of Source Code
1) Involve all the required libraries to connect the ESP8266 Wi-Fi library with Telegram.
- #include <ESP8266WiFi.h>
- #include <WiFiClientSecure.h>
- #include <UniversalTelegramBot.h>
2) Enter network credentials.
- char ssid[] = “YOUR_WIFI_SSID”;
char password[] = “YOUR_PASSWORD”;
3) Establish Telegram bot token id.
- #define BOTtoken “YOUR_TELEGRAM_TOKEN”
4) Start the Telegram bot, Wi-Fi client, and Telegram bot time variable.
- WiFiClientSecure client;
UniversalTelegramBot bot(BOTtoken, client);
int Bot_mtbs = 1000;
long Bot_lasttime;
bool Start = false;
5) Search for new message and its status. Based on the input string suitable action will be taken by ESP8266.
- void handleNewMessages(int numNewMessages)
{
Serial.print(“NewMessages “);
Serial.println(String(numNewMessages));
for (int i=0; i {
String chat_id = String(bot.messages[i].chat_id);
String text = bot.messages[i].text;
String from_name = bot.messages[i].from_name;
if (from_name == “”) from_name = “Guest”;
if (text == “test”)
{
bot.sendMessage(chat_id, “Hello”);
}
if (text == “lamp on”)
{
bot.sendMessage(chat_id, “Lamp ON”);
Serial.println(“Lamp ON”);
digitalWrite(16, 0);
}
if (text == “lamp off”)
{
bot.sendMessage(chat_id, “Lamp OFF”);
Serial.println(“Lamp Off”);
digitalWrite(16, 1);
}
}
}
6) Now, the status function initializes the required setting Wi-Fi network connection and serial monitor.
7) In the loop(), search for new messages, and identify the timestamp of the previous message and the new message. Perform the task repeatedly based on the timestamps.
- void loop()
{
if (millis() > Bot_lasttime + Bot_mtbs)
{
int numNewMessages = bot.getUpdates(bot.last_message_received + 1);
while(numNewMessages)
{
Serial.println(“”);
handleNewMessages(numNewMessages);
numNewMessages = bot.getUpdates(bot.last_message_received + 1);
}
Bot_lasttime = millis();
}
}
If you have any questions regarding Home Automation using ESP8266 and Telegram, feel free to post them on the Comment Box below and don’t forget to follow us on 👍 Social Networks😉