
17 Aug OLED Graphic Display Interfacing with NodeMCU
In this blog, we can learn about OLED Graphic Display Interfacing with NodeMCU.
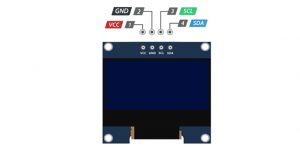
The OLED module depicted in the above picture is one of the renowned modules available in the market. Several variants of this module are currently available with diverse resolutions, modified communication protocols, and different pixel colors. The backlight is not required for this OLED module, as the display is capable of generating light on its own. Hence, power consumption is also significantly less when compared to other displays. Both I2C as well as SPI based OLED modules are easily available now in the market.
In this blog post let’s learn step by step using appropriate examples, images, and codes on how to display an image on an 0.96 OLED.
Hardware Requirement:
- NodeMCU
- Connecting Wires
- 0.96OLED
- USB Cable
Software Requirement:
- Arduino Ide
- Image to bitmap code converter(https://javl.github.io/image2cpp/)
PIN DIAGRAM:
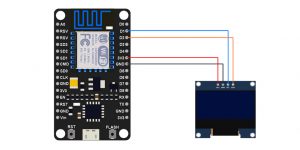
| OLED Display Interfacing with NodeMCU |
CONNECTION:
NodeMCU OLED
GPIO5 SCK
GPIO5 SDA
VCC VCC
GND GND
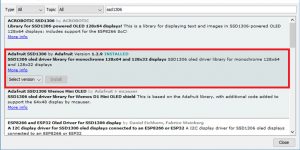
Installation of SSD1306 OLED Library – ESP826:
1. In your Arduino IDE, select Sketch, followed by Include Library, and Manage Libraries. The Library Manager will open.
2. In the search box, type “SSD1306” and install it from Adafruit.
3. Once the SSD1306 library installation from Adafruit is done, type “GFX” in the search box and install the GFX library.
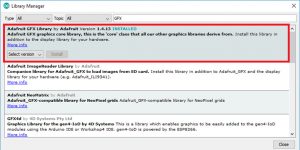
OLED Display Testing with ESP8266:
Once the required libraries are installed, You will be able to add both the Adafruit GFX and Adafruit SSD1306 libraries.
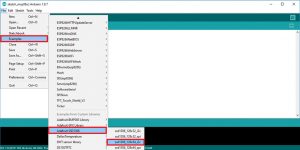
Image to Adafruit_GFX Bitmap Code Conversion:
Step 1: From https://javl.github.io/image2cpp/ choose the logo image of size 128*64 Pixel
Image Logo:
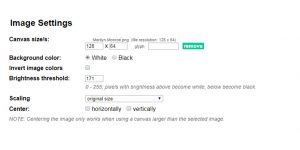
Step 2: Once the image is added to imagetocpp file, select the appropriate settings
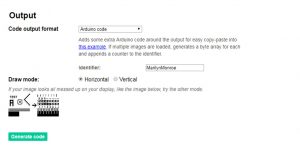
Step3: Now, you can generate the Adafruit_GFX Bitmap Code
Step4: In your Arduino code, add the bit map code as shown below
Source code:


This code represents how to display a simple text, animated text, and other images on 0.96OLED interfacing NodeMCU.
If you still have issues in this topic, do not hesitate to post your queries in the Comment Box below, and for more such interesting and informative technical write-ups follow us on 👍 Social Networks😉